Grid navigation
This application note describes how to enable and use grid navigation on the REM400 and REM500
What is grid navigation?
The REM400 and REM500 provide two types of view for menu navigation: list view and grid view.
List view presents the menu items in one of two vertically selectable lists, where one list presents the profiles, and the next presents the selected profile's functions.
List view
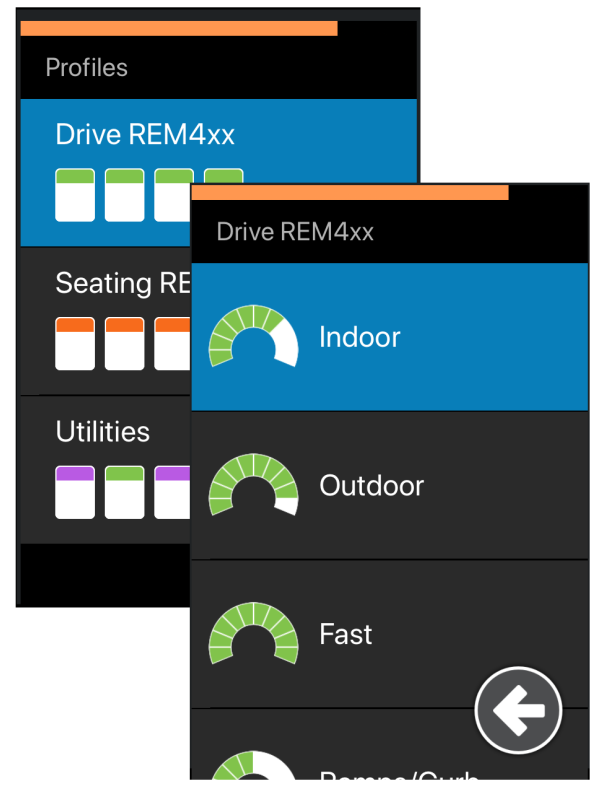
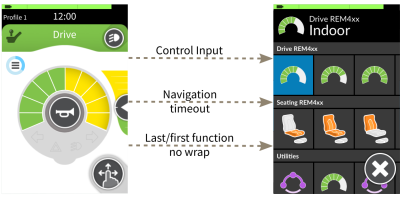
Grid view, on the other hand, presents the menu items in a single grid, displaying both the profiles (rows) and the functions (columns) at the same time.
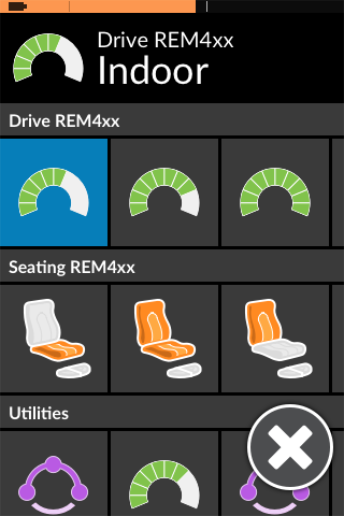
Grid view
Unlike list view, where navigation is restricted to the vertical direction, grid view permits the user to navigate in both vertical and horizontal directions, simplifying the transition between profiles and functions.
This application note only considers the enabling and use of grid view.
Navigating in grid view
There are two ways to navigate in grid view. They are:
-
using menu select: this provides a manual mode of operation where the user performs both the navigation and the function selection.
-
using menu scan: this provides a partially automatic mode of operation where the system performs the navigation and the user makes the function selection.
The following section describes how these two modes work.
Navigating with menu select
The user navigates the grid manually by moving vertically or horizontally from one menu item to the next.
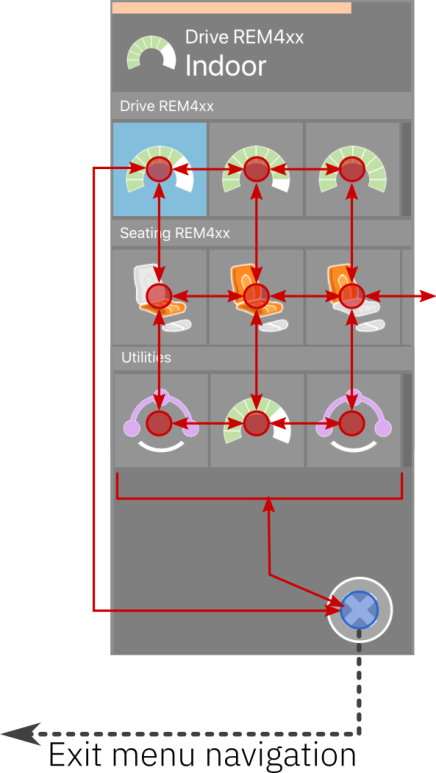
Navigating with menu select
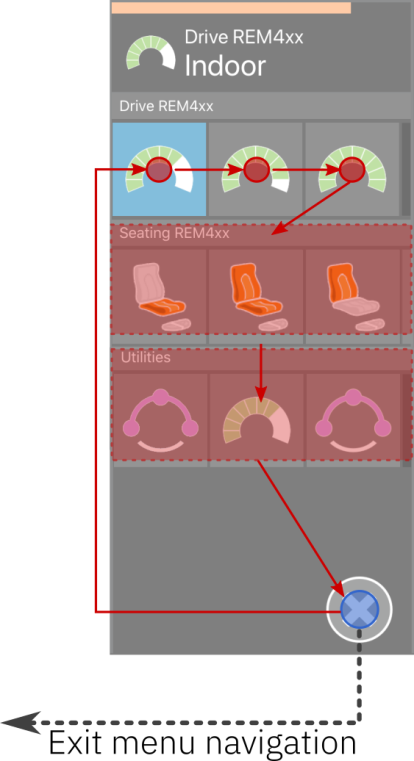
When a menu item becomes selectable, its background is highlighted blue. Typically, the user will navigate to the required function, moving horizontally within profiles or vertically across profiles, and select it, at which point the function becomes active.
| NOTE | The grid view can only show a limited number of profiles and functions at any one time. Further functions and profiles can be revealed, if available, by navigating down for profiles, and right for functions. |
Moving to an item and selecting it depends on whether the user input is a 3-quadrant (3Q) or 4-quadrant (4Q) device, as detailed next.
4Q users are able to navigate through the menu in both directions vertically (up / down) and both directions horizontally (left / right). Navigating vertically, a forward demand navigates to the previous profile in the menu and a reverse demand navigates to the next profile.
Navigating horizontally, a short left demand navigates to the previous function and a short right demand navigates to the next function. At any time, a function can be selected with a long right demand — when a function is selected, it becomes active. If a long left demand is given at any point, the menu will be exited. Alternatively, the user can navigate to, and select the exit button to leave menu navigation.
3Q users are able to navigate in one direction vertically (down) and one direction horizontally (right). Navigating vertically, a long right navigates to the next profile in the menu. Horizontally, a short right demand navigates to the next function. At any time, a function can be selected with a short left demand. If a long left demand is given at any point, the menu will be exited. Alternatively, the user can navigate to, and select the exit button to leave menu navigation.
Navigating with menu scan
The system navigates automatically through the menu items, moving left to right when in a profile, and from top to bottom, through the profiles when no profile is selected. After highlighting the final profile, the exit button is highlighted.
Whenever a menu item (profile or function) is highlighted, the user can choose to select it or ignore it. If a highlighted profile is ignored, the next profile below it is highlighted. If a highlighted function is ignored, the next function to the right is highlighted after a short duration. The duration between highlighting one menu item and the next is set by the parameter Scan Selection Interval. If all functions are ignored in a profile, the system reverts to highlighting profiles only.
The menu is iterated a set number of times. The number of iterations is set by the parameter Number of Menu Scan Cycles before Idle. If no selection is made when the set number of iterations is reached, then the system enters a
Navigating with menu scan
The system can enter the idle state from either the profile menu or the function menu. To exit the idle state, the user must provide a select command. When exiting the idle state, the system returns to the function specified using the Navigation Entry setting.
To exit menu scan, the user must select the exit button when it is highlighted.
Enabling grid navigation
To set up grid navigation, you need to define the navigation menu type (menu scan or menu select), the view and how it is accessed (navigation timeout, control input, or function change at end of profile).
The following shows the minimum steps required to set up menu navigation with the LINX Access PC tool or the LiNX Access iOS tool. Consult the LiNX Systems Installation Manual for information about other settings that are useful when setting up menu navigation.
Step 1 - Set the navigation menu type Under User Preferences | USER FUNCTION NAVIGATION, set the Navigation Type parameter to:
- Menu Scan (see step 4), or
- Menu Select
Step 2 - Set the navigation menu view Under User Preferences | USER FUNCTION NAVIGATION, set the Navigation Menu View parameter to Grid View.
Step 3 - Set how the navigation menu is accessed The navigation menu can be accessed in three ways:
- from a navigation timeout
- from a control input
- after a function change at the end of a profile
Navigation menu can be accessed in three ways
To access menu navigation from a navigation timeout:
- Under User Preferences | USER FUNCTION NAVIGATION, set Enable Timeout for Navigation Entry to On.
- Under Functions | [Profile name] | [Function Name] | GENERAL, set Navigation Timeout Enabled to On for each function that you want to time out from.
To access menu navigation using a control input:
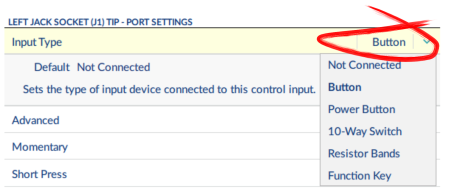
- From the control input's Input Type drop-down box, choose the type of switch connected to the control input (for example, "Button") — see NOTE 2.
Choose input type
- From one of the switch options displayed (for example, Long Press), select Display Actions from the first drop-down box to the right of the arrow, and then select Enter Navigation Menu from the second drop-down box (see Accessing menu navigation using a control input).

Accessing menu navigation using a control input
To access menu navigation after a function change at the end of a profile
Under Functions | Profiles, set Enter Navigation Instead of Function Wrap to On. This parameter is set for each profile individually.
Step 4 - Set how a menu item is selected (menu scan only) If Navigation Type is set to Menu Scan, you will need a method of selecting the menu item. There are two options:
- use the primary input
- use a control input
To use the primary input:
- Set the Scan Selection parameter to either Any Quadrant or Left/Right Quadrant Only.
To use a control input:
- From the control input's Input Type drop-down box, choose the type of switch connected to the control input (for example, "Button") — see NOTE 2.
- From one of the switch options displayed (for example, Short Press), select Display Actions from the first drop-down box, and then select Select Menu Item from the second drop-down box — see Grid navigation.

NOTE If you do not want the primary input to be able to make selections, set the Scan Selection parameter to Disabled. If the user wishes to use both the control input and their primary input for making selections, Scan Selection can be set to Any Quadrant or Left/Right Quadrant Only.